Tampilkan postingan dengan label dollhouse furniture. Tampilkan semua postingan

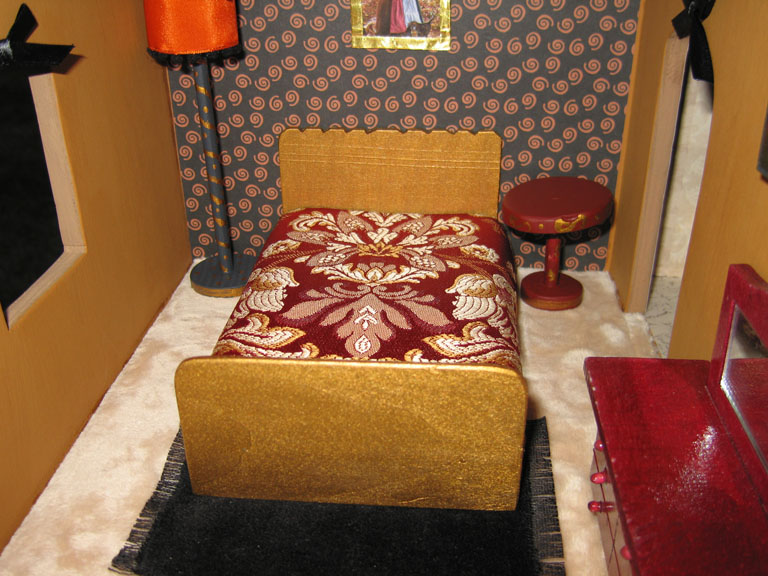
Using decorator fabric to make dollhouse bed covers and spreads

Posted by sew4tejhtr6ier Sabtu, 02 Juli 2011 0 komentar
Often window covering places or interior decorators have old fabric sample books that they throw out when new ones come.  If you can get some of these, they have great dollhouse-sized swatches.  In these pictures 3 different fabric swatches were used to make bedspreads for wooden dollhouse beds.  Simply cut out the swatches and fray check the edges.  Since these particular ones were very stiff fabric, I chose to glue the ends down to the bed (can you see the rubber bands used to keep it in place until it dried?).  


Baca Selengkapnya ....

A quick, cheap doll house waste basket...

Posted by sew4tejhtr6ier 0 komentar
Use an old cap (from toothpaste, hairspray, etc.) for a quick dollhouse garbage pail!


Baca Selengkapnya ....

How to make your own dollhouse mantel clock...

Posted by sew4tejhtr6ier 0 komentar


Making your own doll house mantle clock is quick and easy...

1. Find a piece of trim that has a profile you like.


2. Cut off a small chunk about 1/2 inch deep.

3. Do an image search to find the type of clock face you want and print it.  I took this picture myself, so you are free to use it (personal use only, no resale).


4. Paint or stain your clock and let dry.

5. Glue on the clock face.

6.  You can stop here, or for a more playable dollhouse mantel clock, spray it with clear acrylic sealer.


For instructions on how to make a grandfather clock for your dollhouse, please see our earlier post.  

Baca Selengkapnya ....

How to make your own doll house floor lamp

Posted by sew4tejhtr6ier Sabtu, 16 Oktober 2010 0 komentar
Making your own dollhouse floor lamp is quick and easy:


1. Cut a small diameter rod to the height you want your lamp to be.
2. Cut 2 small disks from a large wooden dowel or rod
3. Punch a hole in the center of each of these disks the same diameter as your small rod.  (A drill press works best, but you can do it however works for you.)
4. Insert the long narrow dowel into the holes, secure in place with glue


5. Paint it!


6. Glue a small bit of ribbon trim around one end.


7. Add any embellishments to "dress up" your light.


That's it!  Have fun!  

Baca Selengkapnya ....

How to make your own dollhouse daybed!

Posted by sew4tejhtr6ier Kamis, 21 Januari 2010 0 komentar
You can create your own doll house day bed by following the directions in our no-sew doll house sofa post.  Just use a larger block for the base.  For back shape ideas you can look at pictures of real day beds.  Here are pictures of a couple I did with different kinds of fun feet!


Baca Selengkapnya ....

Painting dollhouse tables and chairs

Posted by sew4tejhtr6ier Sabtu, 12 Desember 2009 0 komentar
Any of you who can actually paint will look at these pictures and know that I cannot :)  But there's something unstressful about painting patterns... if any of you have a habit of doodling while you're on the phone or waiting on hold, you can definitely paint on doll house furniture!  Here are pictures of some of my doll house table and chair doodlings... maybe it will inspire you to try too!  One thing nice about paint, if you don't like it, just wait until it's dry, paint over it, and try again!  Use a tiny brush.


Baca Selengkapnya ....

Another dollhouse stove picture...

Posted by sew4tejhtr6ier Jumat, 11 Desember 2009 0 komentar
Here is a picture of another wooden doll house stove.  Unlike the other wooden stoves I've done, this one has all painted on faucet handles, door pulls, and stove burners.  These particular ones were not meant to look "real", so I used pink!


Baca Selengkapnya ....
Trik SEO Terbaru support Online Shop Baju Wanita - Original design by Bamz | Copyright of wallpaper apps.